In one sentence
A Management of Change record (MOC) is a controlled change to a process, document, piece of equipment, or system — the system picks the reviewers and the required artifacts based on what's changing, so risky changes get the right scrutiny without anyone having to remember the rules.
- Templates seed the checklist. Pick a change type (Equipment swap, Spec revision, etc.) and the right required artifacts — FMEA, JHA, before/after SOPs, training updates — appear on the MOC automatically.
- The checklist is frozen at creation. Edits to the template don't retroactively touch MOCs that are already open, which keeps audit history defensible.
- You can't submit for approval with required items missing. The system hard-blocks submission and tells you what's outstanding.
How an MOC moves through QFormance
Emergencies skip ahead — see *Emergency MOCs* below.
A closed MOC is terminal — there's no reopen. Unlike NCRs, audits, FMEAs, and JHAs, an MOC that's been implemented and closed can't be reactivated; a further change starts a new MOC. That's deliberate — the record captures one change decision the org acted on, and keeping it fixed is what the audit trail relies on.
Creating an MOC
From MOC → New MOC:
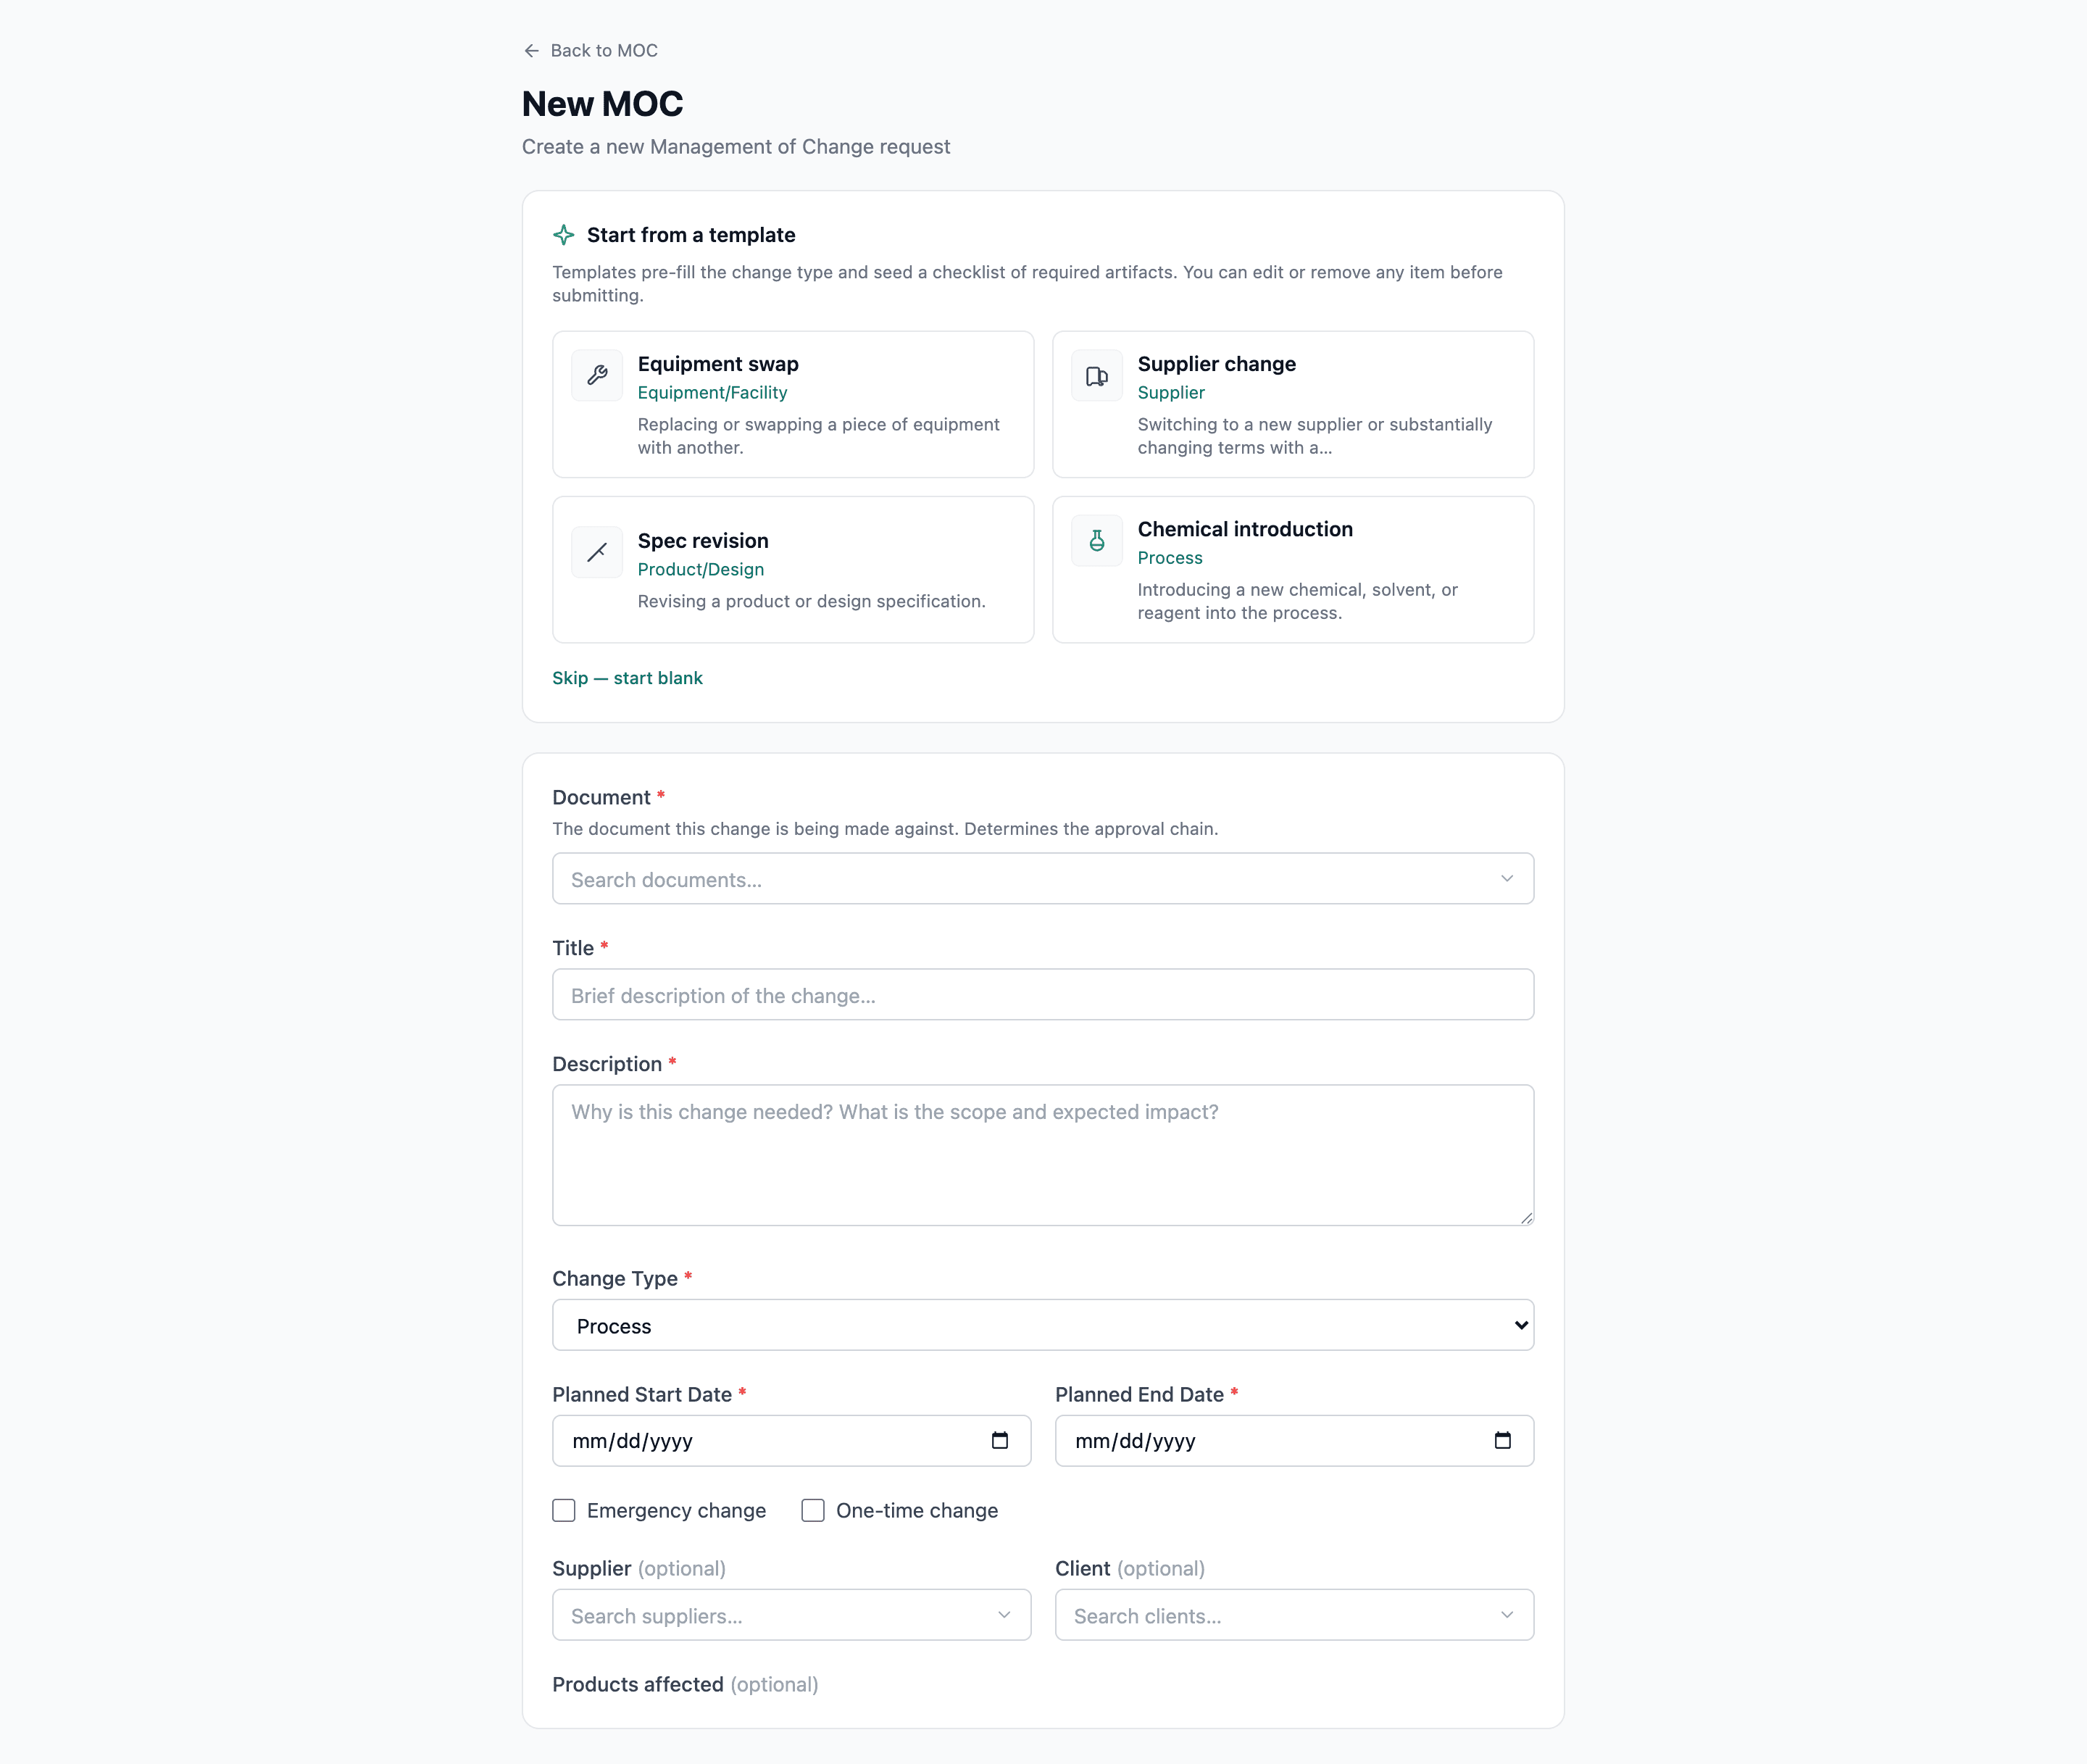
Template gallery. Pick a change type — e.g. Equipment swap. Pre-fills the form and seeds the checklist.
Required artifacts. Edit the labels, drop items that don't apply, add custom ones. Defensible config, not magic.
Scope and document. The document determines who'll review the change.
The form steps you through:
- (Optional) Pick a template — change type, description, and a checklist of required artifacts pre-fill.
- Select the document this change is against — drives approval routing.
- Set title, description, and change type.
- Optionally mark as emergency or one-time change.
- Set facility and department scope.
- Edit, remove, or add to the seeded checklist before creating.
Templates and required-artifact checklists
Templates are admin-managed presets — Equipment swap, Supplier change, Spec revision, Chemical introduction. Each one seeds a checklist of required artifacts onto the new MOC:
| Change type | Seeds (typical) |
|---|---|
| Equipment swap | Before/after SOP slots, FMEA, operator JHA, equipment-register action |
| Supplier change | Before/after spec, supplier risk assessment, receiving-inspection action |
| Spec revision | Before/after document, FMEA refresh, customer notification action |
| Chemical introduction | SDS attachment, JHA, training update, storage update action |
Two principles guide how templates behave:
- Defensible config, not magic. Every item is visible on the New MOC form and is fully editable. Change a label, drop an item, mark one optional, add a custom item — all before you submit.
- Frozen at creation. The checklist is copied onto the MOC when it's raised. Editing the template later does not retroactively touch MOCs that are already open. Each MOC keeps the checklist it was opened with, in audit history.
The Checklist tab
Every MOC has a Checklist tab that shows the required-artifact list and tracks completion. Most items satisfy automatically as you work the MOC:
- Document link items (with a Before / After / Reference role) tick when a matching link is added on the Documents tab.
- FMEA / JHA / Risk items tick when the corresponding entity is linked on the Links tab.
- Attachment / Action item / Custom items tick manually.
A progress banner at the top of the page shows how many are complete.
The Submit for approval button is hard-blocked while any required item is unsatisfied. The error lists exactly which items are missing — fix those, then resubmit.
The tabs at a glance
| Tab | What lives here |
|---|---|
| Overview | Details summary card (facility scope shown last), Risk Assessments card, and access status |
| Details | Edit basic details |
| Risk | Risk assessments — import from register or create new |
| Approvals | Set approvers and submit |
| Actions | Track actions related to the change |
| Documents | Link related documents (Before / After / Reference) |
| Checklist | Required-artifact checklist with completion state |
| Attachments | File attachments |
| Links | Connections to other modules |
| Access | Per-record access control (if you have the capability) |
| History | The unified record-history feed — see Record history |
The Overview tab leads with a Details summary card — title, description, change type, risk scores, reference number, supplier / client, dates, and the emergency / one-time flags — with the facility scope shown last, under a divider at the foot of the card (the standardized Overview layout across modules reads scope last, not first). Below it sits a Risk Assessments card listing each assessment on the MOC with per-risk Potential and Residual badges, then an Overall potential / Overall residual pair under a divider.
Approval workflow
Approvers are resolved automatically when you submit:
- The document the MOC is against.
- The change type (Equipment swap vs Spec revision vs ...).
- The risk level — computed, never typed. QFormance takes the worst (highest) potential score across the MOC's risk assessments and maps it through your org's risk-matrix bands. The badge is live while the MOC is draft or rejected (it recomputes as you score assessments) and freezes at submit for approval, so routing keys off a stable value. Editing scores on an already-submitted MOC doesn't reshuffle an in-flight approval; a rejected-then-resubmitted MOC recomputes. It works exactly like the exemption risk level.
- The facility — a facility-specific routing rule takes precedence over the org-wide fallback for the same change-type / risk-level key.
Routing rules — admin-configured on the MOC tab of Admin → Approval Routing — combine those dimensions to pick the right approvers.
The resolved chain is shown before you submit, not sprung on you. When a routing rule matches the draft MOC, the Approvals tab displays the rule-resolved approver chain read-only, tagged "Set by approval routing rule (high risk)", and hides the manual approver pickers — submitting would apply the rule regardless. The manual pickers surface only when no rule matches, which is the one case where picking approvers by hand actually decides anything.
A few things to know:
- Editing during pending approval resets the chain. If you change something material after submitting, the chain re-resolves and the approvers re-vote. This is intentional — approvers only sign off on a stable record.
- Required checklist items must all be satisfied before submitting. No exceptions in standard flow.
- Step-up confirmation may be required. If your organization has Require passkey for approvals turned on, approving an MOC and closing an MOC each prompt for a fresh passkey confirmation. The confirmation lasts 5 minutes. The approver must have at least one passkey enrolled. See Auth policy and Passkeys.
Emergency MOCs
Mark the MOC emergency at create-time to bypass the standard approval chain. Only the highest-level approver is required, and a post-approval review window is configured at Admin → MOC → MOC Settings. Use sparingly — emergency use is logged and visible to oversight.
Admin
| Page | What you configure |
|---|---|
| Admin → MOC → MOC Settings | Change types catalog, emergency review window, FMEA/JHA requirements per change type, document automation |
| Admin → MOC → Approval Routing | Approver assignments per change type and risk level |
| Admin → MOC → MOC Templates | Templates and their required-artifact checklists. Requires the Manage MOC templates permission. |
Removing a change type that's already in use
Deleting a change type that real MOCs already reference shows a usage warning — "5 in-flight MOCs use this change type; 2 routing rules and 1 template reference it" — and asks you to confirm. Existing MOCs keep their change type; the option just stops appearing in new-MOC pickers, routing-rule pickers, and template editors.
If the change type controls FMEA / JHA artifact requirements for that type, the editor also shows a preview of which in-flight MOCs would lose required-artifact entries if those requirements changed at the type level. Use the preview to decide whether the change is safe to ship.
If you delete an MOC
MOCs can be deleted while they're still pre-approval — Draft, Submitted, or Rejected. The record lands in Trash for 90 days, where an admin with the Manage trash permission can restore it. Restoring brings the change-type, checklist, risk assessment, linked documents, and routing chain back together.
MOCs that have crossed into Approved, Implementing, or Closed status are permanent — the delete button is hidden on them. They represent a decision the org has acted on; removing them would break the audit trail an inspector relies on. There's no way to remove one after that: an MOC has no reopen, and cancellation only applies before approval — so once an MOC is approved it stays in the register for good.
See Soft-delete — how it works.
Finding MOCs in the list
The MOC list page has a filter for every column right in the table header — narrow by change type, risk level, status, scope, and so on, all at once. A count of matching MOCs sits in a footer strip below the table, so you always know how big the set you're looking at is.