In one sentence
A passkey is a credential stored on your device (or synced via iCloud or Google) that signs you in with one tap of Touch ID, Face ID, Windows Hello, or a hardware security key — and the same passkey confirms sensitive actions when your org's auth policy requires it.
- Enroll once, use everywhere. A passkey covers sign-in, step-up confirmations, and can serve as a factor for multi-factor authentication.
- Enroll multiple devices. Phone, laptop, hardware security key (YubiKey, Titan, any FIDO2 key) — they all live alongside each other in your profile.
- Your authenticator app is what satisfies MFA. A passkey signs you in; it is not a second factor. Recovery codes are minted with the authenticator app, so keep those safe.
Platform authenticators vs. hardware security keys
A passkey can live on a platform authenticator built into a device — Touch ID, Face ID, or Windows Hello — or on a roaming hardware security key you carry with you: a YubiKey, a Titan key, or any FIDO2 key.
QFormance requires user verification on every passkey. A hardware security key must have a PIN set before it will enroll — a key with no PIN (or biometric) can't satisfy the prompt.
A passkey is a primary login — a passwordless way to sign in. It is not a second factor: after a passkey login you still enter a code from your authenticator app. See Multi-factor authentication.
Enrolling a passkey
- Open your Profile from the sidebar.
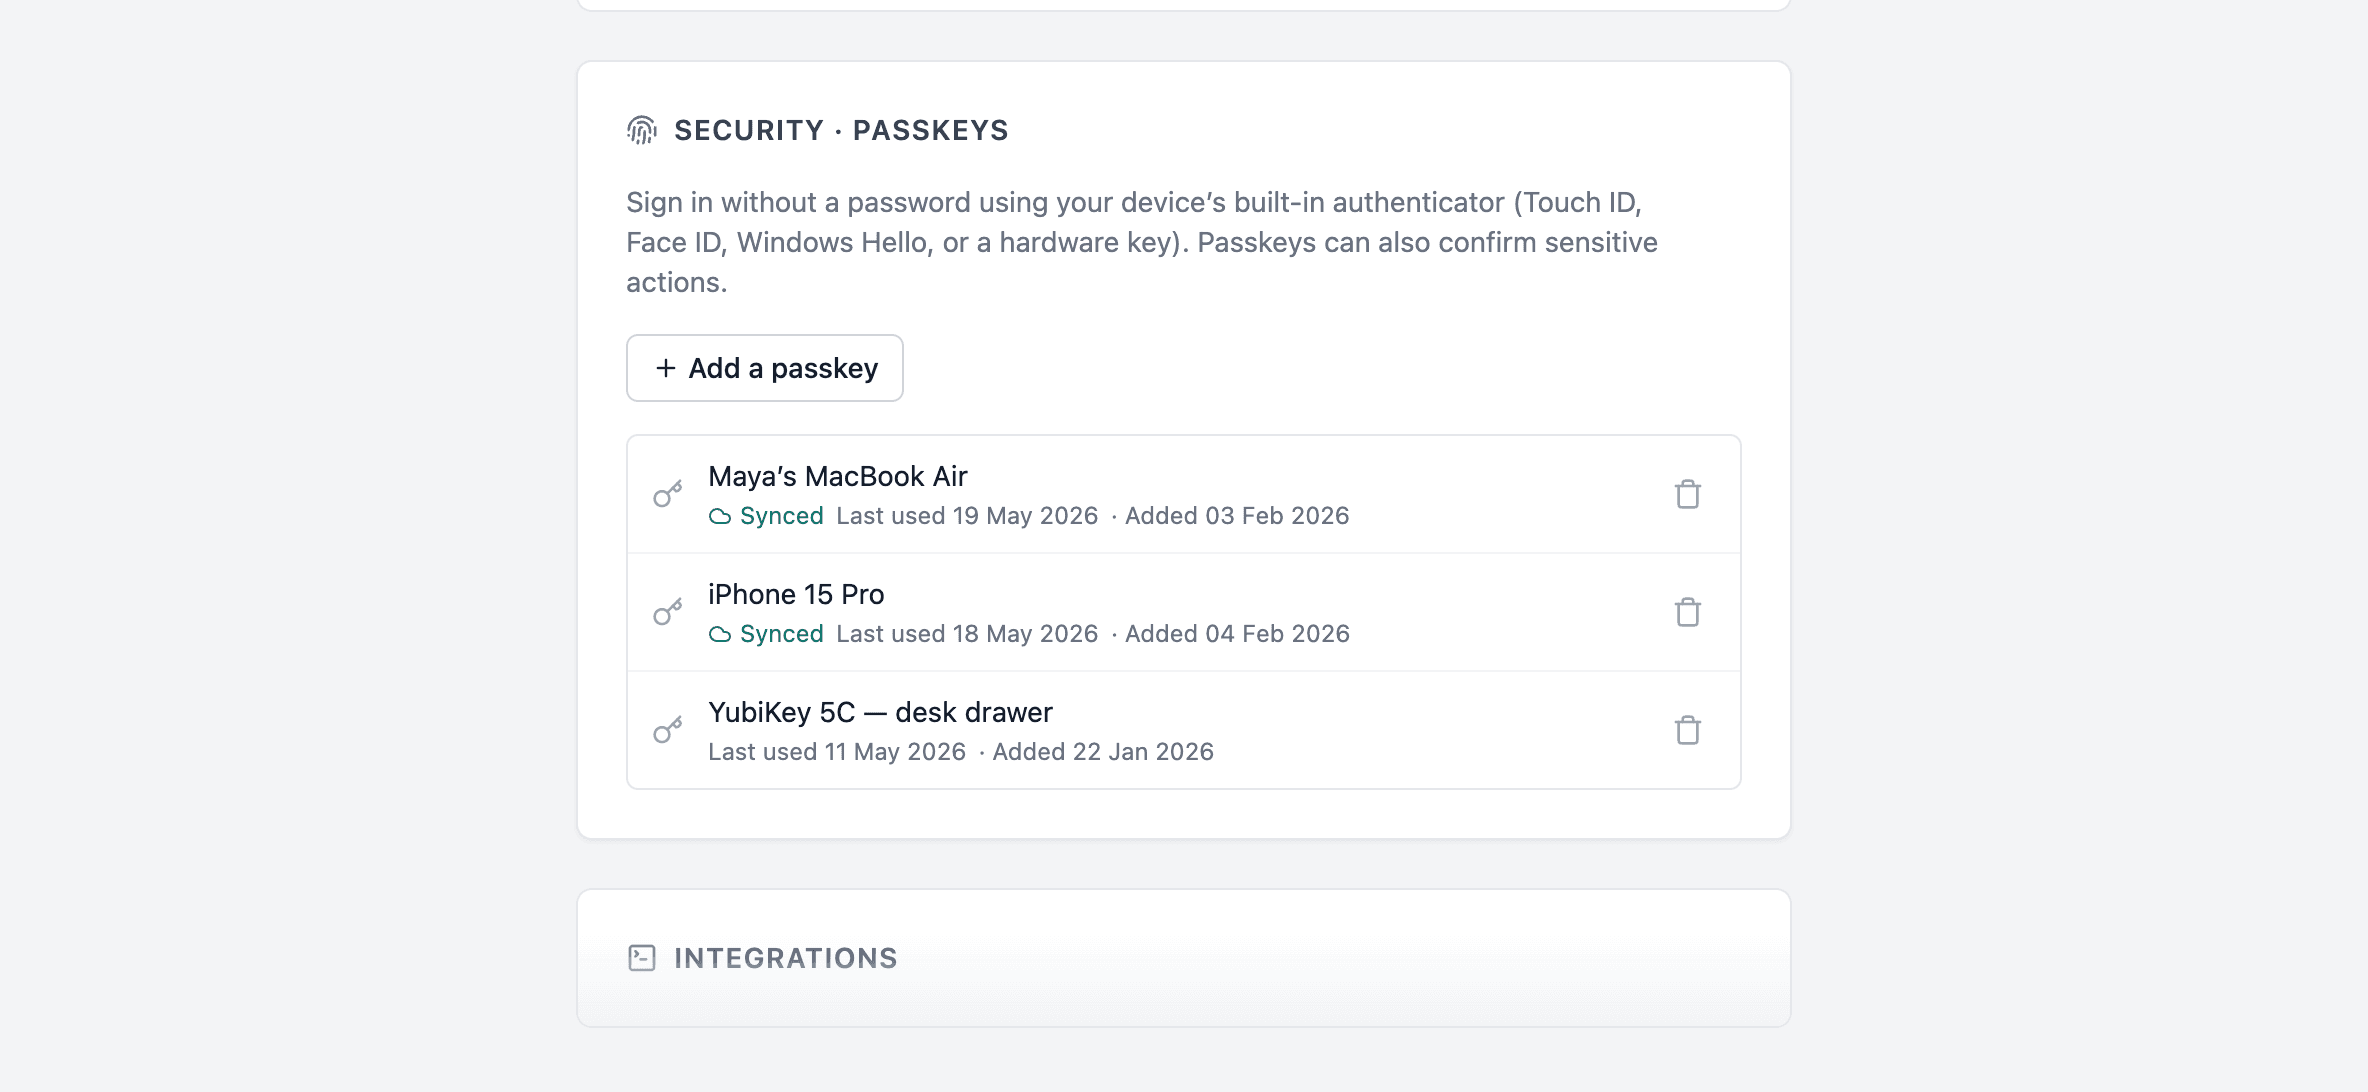
- Find the Security · Passkeys card.
- Click + Add a passkey and (optionally) name the device — "MacBook Air", "iPhone", "YubiKey 5".
- Your browser surfaces the platform's native prompt. Approve with Touch ID, Face ID, Windows Hello, or your hardware key.
- The new passkey appears in the list with the device name, when it was added, and (if relevant) a Synced badge for iCloud / Google-managed credentials.
You can enroll as many passkeys as you have devices. Each one is private to you — other people in your organization can't see or remove your credentials.
Signing in with a passkey
On the login page, click Sign in with a passkey. The browser offers credentials it has for this site — pick one and tap to confirm. No email or password.
If your browser supports conditional UI (recent Chrome / Safari), the passkey may auto-suggest from autofill before you click anything.
Confirming sensitive actions (step-up)
If your organization's auth policy requires step-up, certain actions prompt for a fresh passkey confirmation:
- Approving any step on a document, or direct-publishing a patch revision
- Approving or closing a Management of Change (MOC)
- Approving an Exemption
- Approving a JHA or FMEA
- Closing an NCR
- Closing a meeting
Click the action as normal. A Confirm with your passkey modal appears. Tap to confirm — the action proceeds and the audit trail records the timestamp. The next five minutes of sensitive actions skip the prompt automatically.
If you haven't enrolled a passkey yet
If step-up fires on you before you've enrolled a passkey, the modal shows an amber-tinted panel with an Enroll a passkey now link instead of a dead-end error. The link opens your profile in a new browser tab so you don't lose the form you were in the middle of submitting.
The flow:
- Click the action as usual.
- The Confirm with your passkey modal opens; instead of the fingerprint prompt you see "No passkey enrolled — add one in your profile first."
- Click Enroll a passkey now — your profile opens in a new tab on the Security · Passkeys card.
- Add a passkey there.
- Switch back to the original tab. The modal is still open. Click Confirm with passkey again — the new credential satisfies the prompt and the action proceeds.
If your org admin has set up the policy carefully, they were warned about your missing passkey before the toggle went live (see the Two-tier guard section in Auth & sign-in policy) — but the inline enrollment CTA is here as a fallback so nobody gets hard-blocked.
See Auth & sign-in policy for the policy that turns step-up on.
Enroll a backup
The one-time recovery codes are minted when you enable the authenticator app (TOTP) — not when you enroll a passkey. Since the authenticator app is what satisfies MFA for everyone, you will always have codes; store them somewhere you can reach without your phone. If you lose both, getting back in means an administrator reset.
The fix takes two minutes and you only have to do it once: enroll a second authenticator now, while you still can. Any of these work —
- A second passkey on another device (laptop and phone).
- A hardware security key kept somewhere else — a drawer, a safe, not the same bag as your laptop.
- An authenticator app, which also gets you a set of recovery codes.
This matters most for people whose accounts are hardest to recover: the sole admin of an organization, and anyone traveling with exactly one device.
Recovery
| Situation | What to do |
|---|---|
| Lost a device, still have another enrolled factor | Sign in with the remaining factor, enroll a replacement from the Security card, then remove the lost device. |
| Lost a device, still have recovery codes | Use a recovery code at the sign-in challenge, then enroll a replacement passkey. |
| Lost every factor | You can't self-recover — a password alone won't do it. Ask an admin to reset your MFA from Admin → Users; see Account recovery. |
Those are two different actions on two different rows of the admin page. A new temporary password gets you past the first step and no further — you'll still be asked for an authenticator code. If you've lost your authenticator app AND your recovery codes, the thing to ask for is an MFA reset.
Removing a passkey
In the Security card, click the trash icon next to the passkey. Confirm in the dialog. The passkey is invalidated immediately — anyone holding the device can no longer use it to sign in or confirm actions on your behalf.
Passkeys can be removed freely — they are a way of signing in, not the thing that satisfies MFA, so deleting one leaves your authenticator app untouched. Just keep at least one way to sign in: remove your last passkey and you are back to a password or SSO.
Once you have another factor in place, removing a passkey just falls back to your remaining sign-in methods (assuming they're allowed by your org's auth policy).